Friday, November 18, 2011

Company Dinner

So conventional wisdom says that you shouldn't try out new dishes when you are having company...but I'm not very good at following a conventional track. I figure that if it goes horribly awry, we can always order pizza. Consequently, by signing up to come to our house for dinner, it is very likely that you will end up eating something I have never attempted making before. Such was the case this evening.

Fortunately, our dinner guests are not usually picky - nor is my husband. As we have recently come into possession of an enormous quantity of Utah raised pheasant (thanks to husband and Father-in-Law, who shot over THIRTY a few weekends ago) I decided we needed to start putting a dent in our supply. I don't know many people who have cooked with pheasant, and my usual source of inspiration - the internet - took me to mostly untested sites put up by avid hunters, who seem to be less than avid cooks. But then I randomly happened to be flipping through one of my most beautiful, yet least used, cookbooks - Boulevard. After dining there a few years ago, the book was given to me as a gift. I promptly made the recipe for Corn Ice Cream (delicious!) and never found another use for its delicious yet complicated recipes.

But this time, I thought I could do it. I could take a few shortcuts and spread out the work and give it a shot. To start with, I decided we should have the trusty No-Knead Bread. I have made this bread many times and it never fails to impress. That way, if the rest of the meal was horrible - we could have extra-tasty grilled cheese sandwiches. To make it a little tastier, I added some fresh rosemary and roasted garlic. The house smelled amazing.

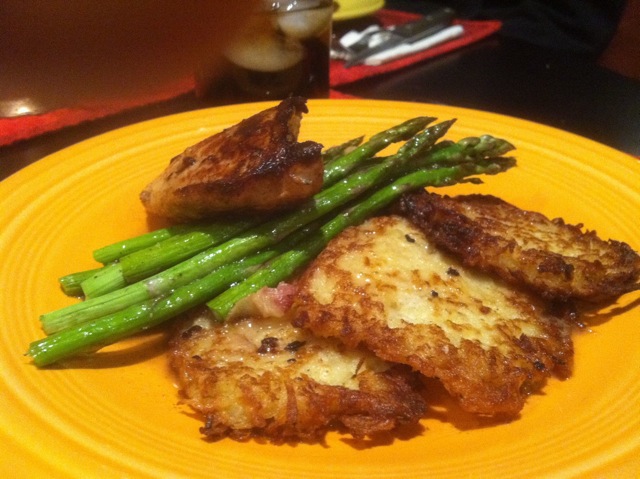
With the bread finished, I focuses on the main event. The dish I would be tackling (with some shortcuts and exchanges) was Pan-Seared Pheasant Breast with Cognac soaked Prunes, Braised Bacon, and Pearl Onions in a Pheasant Stock. I would serve this over Roasted Asparagus and Potato Pancakes. Now if anyone HAS pheasant and really wants this recipe, I would be happy to give it you - but it was a LOT of work. It involved soaking the pheasant breasts overnight in cream, salt and pepper and thyme. Then searing the pheasant legs in oil and adding some onion and other vegetables and simmering a stock for an hour. Then there was braising the bacon and soaking the prunes...not to mention the potato pancakes (which I love in any form and with almost anything). BUT it turned out really tasty, if just a bit salty. The prunes sort of negated the salt though, so all was well!

And dessert was fantastic! Let's face it, the MAIN reason I invite people over for dinner is to try out new desserts. I had recently received a copy of Jeni's Splendid Ice Creams and not only were there a lot of great flavors, there were a lot of great sundae ideas as well. So I went with a sort of Mexican themed concoction called the Chocomole Sundae. The main component was "Queen City Chocolate," a spiced chocolate ice cream with cinnamon and cayenne. Delicious on its own, it was even better with the accompanying Praline Sauce (although I like my butterscotch sauce better) salt-roasted almonds, fresh whipped cream, cinnamon sugar and a weird but tasty garnish of "Frito Crunch." Basically you melt some chocolate and stir in crushed fritos. Made it taste sort of like Fried Ice Cream - in a good way.

So, it was a lot of work, but I do like being in the kitchen, so I thought it was worth while. And the boys cleaned their plates, so that must have been good. Let me know if you want any of the recipes - I may just post them separately. Now that I am back to this blogging thing, I have to take it slowly, you know...

Monday, May 24, 2010

Salmon. And Granola.


Being the recent recipients of TEN POUNDS of salmon, I figured we should get to eating some of it. Admittedly, I have have some issues with salmon in the past - there was a fateful weekend in Oregon many summers ago where my mom and sisters and I swore we were fed so much salmon we were ready to start swimming upstream. Fortunately, I have spent a good amount of time in Northern Washington and Alaska in the last several years, and I have grown to appreciate what delicious salmon can taste like. Still not my favorite thing to eat mind you - but it can be good.

In addition, salmon gets a TON of good press about being so healthy for you (wild, not farmed) and especially if you are pregnant. The salmon that we were the proud recipients of is none other than the acclaimed Copper River Red salmon - 'fishable' for only a small window of each year and coming to us FRESH from the very waters it was caught in. Of course, we had to freeze most of it - one can only consume so much salmon at a go. But here is my favorite recipe for preparing it - pretty easy, pretty healthy, and pretty tasty. As a bonus, the glaze/herb mixture has so much flavor that it can mask the taste of lesser salmon, or disguise it completely for any non-salmon fans out there. Of course, if you have salmon this good, go sparing with the glaze so you can actually taste the fish.

Of course, after frying/roasting salmon in my house, I could not stand the smell. That's were the granola came from. Incidentally, the granola recipe is ALSO from Northern Washington. Coincidence? Yes, probably.

SEAR ROASTED SALMON with GINGER LIME SAUCE
feeds 8 but can easily be halved


This recipe comes from a fantastic woman that I used to work with in San Francisco - she runs an incredible company called Parties That Cook (partiesthatcook.com). The recipe is a little bit of effort, but it is really good and looks restaurant worthy!

Salmon:
3 1/2 lbs. filet of salmon, skin removed
Kosher salt and pepper

Glaze Mixture:
1/4 cup fresh lime juice (can substitute lemon juice)
1/2 cup rice wine vinegar
1/4 cup light soy sauce
1/4 cup light corn syrup
1/2 cup peanut oil
1 Tablespoon brown sugar
1/2 teaspoon of kosher salt

Herb Mixture:
3 Tablespoons grated ginger
2 Tablespoons finely minced garlic
1/2 cup chopped cilantro
1/2 cup green onions, sliced
1/4 cup chopped mint
3 red jalapeños, seeded and finely chopped
1 cup peanuts, coarsely chopped
1/4 cup peanut oil for pan-frying salmon

Methods/Steps:
Preheat the oven to 425°F

Salmon: Remove the pin bones from the salmon. Cut the salmon into six-ounce filets (either by slicing narrow pieces across the whole filet, or cutting the filet in half lengthwise first and then slicing square pieces). Set aside until ready to fry. Just before cooking, season generously with salt and pepper.

Glaze: In a medium non-reactive bowl, combine the rice vinegar, soy sauce, corn syrup, lime juice, salt and brown sugar. Stir to mix and dissolve sugar and salt. Add peanut oil.

Herb Mixture: In another bowl, combine the grated ginger, minced garlic, chopped cilantro, chopped green onions, chopped mint, chopped jalapeno and the coarsely chopped peanuts.

Sear Salmon: Heat a large sauté pan over medium-high heat. Add 3-4 Tablespoons of peanut oil. (Oil should be about 1/8-inch high in the pan). Heat the oil over high heat until it is very hot. Presentation side down, add the 3-4 salmon filets to the pan (do not crowd the pan), and pan-fry until golden brown and crisp (about 3 minutes). Do not move the salmon around in the pan or the crust will not form. When an opaque pink rim about 1/2-inch-thick forms around the bottom edge of the salmon, gently transfer it to a sheet pan with the browned side up. Finish browning the remaining salmon filets.

Roast Salmon: Transfer sheet pan(s) with the seared salmon to the oven and finish cooking, about 8-10 minutes or until the white proteins begin to emerge from the fish. Salmon should still be rare (dark pink) in the center. Remove from the oven and cover loosely with foil to keep warm.

To Serve: Combine the herb and glaze mixtures right before ready to serve. Serve each piece of salmon with a generous spoonful (about 2 ounces) of sauce. Garnish with a sprig of cilantro.

RICE with JADE SAUCE


I like to serve this salmon with rice (white or brown) mixed with this jade sauce. Makes a pretty presentation and gives you more green in your diet! Just prepare the rice as you normally would, then add this sauce and mix well before serving.

* 1/2 c Spinach leaves; firmly
* 1 ts Grated orange peel
* 1/4 c Fresh mint leaves
* 1/2 c Fresh cilantro leaves
* 12 lg Fresh basil leaves
* 2 Green onions; chopped
* 2 tb Dry sherry
* 2 tb White vinegar
* 2 tb Dark sesame oil
* 1 tb Soy sauce
* 2 ts Hoisin sauce
* 2 ts Sugar
* 1/2 ts Chili sauce; Asian
* 1/2 ts Salt

Place ingredients in a blender or food processor container. Blend until pureed. Refrigerate.

EASY GRANOLA

And finally, when you are done smelling up your house with salmon, whip up a batch of this granola - it will make your house smell delicious. And as a bonus, it tastes pretty good too.

4 cups oats (not instant or steel cut)
1/2 cup oil (canola, vegetable, saffron, whatever)
1/4 cup maple syrup (the REAL kind, not Mrs. Buttersworths)
1/4 cup honey
1/8 cup water
2 tsp vanilla
pinch of salt
1/2 tsp cinnamon
1/4 tsp nutmeg
Nuts, flaxseed, dried fruits, etc (optional)

Pour oats into a bowl (I add some flaxseed as well). Mix remaining ingredients (except for nuts and dried fruits) in a saucepan on the stove and heat until JUST coming to a boil. Pour over oats and mix well. Spread out on a parchment lined baking sheet and bake in a 325 degree oven for approximately 30 minutes, stirring every 10 minutes or so, until the granola is lightly browned. If you are adding nuts, you may want to add them in the last ten minutes or so. Remove from oven and let cool on cookie sheet. Once cool, add dried fruits (apricots and cranberries work well) and mix together. Store in a airtight container and enjoy! Keeps for about two weeks.

Monday, February 15, 2010

Green Curry, Zucchini Bread, Waffles, and John Denver


What do these things have in common, you ask? Well - nothing really. Except that JD is who I was listening to a I made all three of these things tonight. The curry turned out good (though not very spicy - I was running out of curry paste). The waffles are a new recipe I am trying out (more on that, later) for Overnight Yeasted Waffles. I plan on eating them with honeyed yogurt and berries and mango. MMM....almost healthy.

The zucchini bread however....oh so sad. I have been struggling with this particular recipe for a while now. It is one of my FAVORITE things that my mom used to make and it is generally a foolproof, easy recipe.

Until you get to high altitude.

I have been living at altitude (usually around 6500 feet) for the last few winters, and I have gotten pretty good and adapting recipes. But no matter what I try with this one, I never seem to get it to turn out right. I have tried decreasing the sugar, adding an egg, adding flour, decreasing baking soda and powder and even playing with oven temperatures, but it ALWAYS seems to fall. It still tastes pretty good - it just doesn't have the right texture. Although it DOES still have the crunchy delicious sugary part on the top (which is the best part anyway!)

So although I am not taking it out for any fancy dress parties, I will eat my zucchini bread happily, still wondering where I went wrong.

Zucchini Bread
my mom's recipe

*Note, despite its name, this is NOt a healthy recipe. ALthough I guess you could theoretically substitute some applesauce or yogurt for some of the oil and sugar. I guess. But, really, why would you?

Beat 3 eggs, then add in order:
3/4 cup of oil
2 1/4 cup of sugar
2 cups grated zucchini (squeeze out the excess water)
1 tsp vanilla
2 cups flour
1/2 tsp allspice
1 tsp cinnamon
1 tsp salt
1/2 tsp nutmeg
1 tsp soda
1 1/2 tsp baking powder

Beat all ingredients together, making sure to mix well. Bake at 325 degrees for about 1 hour in a greased and floured pan - 1 bundt pan or two loaf pans.

Thursday, February 11, 2010

Banana Bread it is!


Well, I caved and even though I have a number of chocolate cookies leftover as well as a growing supply of Valentine's Day chocolates (the BEST Valentine present ever) I caved and made banana bread. But to be fair - it isn't for me.

Matt has some ski clients coming into town and they and their kids seem to really like banana bread - no nuts, no chocolate - JUST plain banana bread. At least, I think they like it. I don't like it that much anyway, so I am giving it to them.

Banana bread has never been one of my favorites - mostly it just tastes like overripe bananas and since I prefer green bananas anyway it isn't really up my alley. But with a few spices added in and a brown sugar/cinnamon crumble (coffee cake style) on top - it isn't bad! Especially if you slice it thick and paint it with a layer of melted chocolate chips....mmm....

BANANA BREAD
(adapted from America's Test Home Kitchen Family Baking Book)

2 cups of flour
3/4 cup sugar
3/4 tsp baking soda
1/2 teaspoon salt
3 large very ripe bananas (about 1 1/2 cups) mashed well
6 tablespoons of unsalted butter, melted and cooled
2 large eggs
1/4 cup whole or low fat plain yogurt
1 teaspoon vanilla extract
1/2 cup walnuts (optional - I leave these out)

Heat oven to 350 degrees and grease a bread pan (about 8 1/2 by 4 1/2 inch loaf pan).

Whisk the flour, sugar, baking soda and salt together in a large bowl. In a medium bowl, whisk the mashed bananas, melted butter, eggs, yogurt, and vanilla together. gently fold the banana mixture into the flour mixture with a rubber spatula until just combined. The batter will look thick and chunky.

Scrape the batter into the prepared pan and smooth the top (this is where I add a mixture of sugar, cinnamon and brown sugar to sprinkle on top). Bake until golden brown and a toothpick inserted into the center comes out with just a few moist crumbs attached - about 55 minutes. Rotate the pan halfway through the baking time.

Let the loaf cool in the pan for about 10 minutes, then turn out onto a wire rack and let cool for one hour before serving.

Then, I suggest slicing it and spreading it with melted chocolate...mmm...everything is better with chocolate...

Sunday, February 7, 2010

Of Steaks and Superbowls


Well, I wasn't exactly invested in the Superbowl (but then again, I never am) but I do like it as an excuse to make fatty foods. So even though we only had one guest over, we had three kinds of dip, three kinds of things TO dip (potato chips, carrots, and pita chips), potato salad (deliciously prepared by Bill) watermelon - yes I know it's February - steak sandwiches with corn mayonnaise, caramelized onions, lots of gooey cheese, tomato and avocado...and of course, cupcakes.

Chocolate cupcakes. With salty peanut butter frosting. And chocolate ganache swirls (I still had some ganache leftover).

Sadly, I am currently too full to eat the cupcakes. But there is time.

The cupcake recipe comes from Ina Garten's Barefoot Contessa at Home, as does the peanut butter frosting recipe (which she attributes to Kathleen King of Tate's Bakeshop. I did make some substitutions, however. For the cupcakes, I substituted powdered buttermilk for fresh and drained whole milk yogurt for the sour cream. I also used dark cocoa powder since it was what I had. They turned out just as delicious as when made according to recipe. One thing to watch out for, though, is that these cupcake will dry out fast. They are not a boxed mix and so do not have the chemicals and preservatives that keep them fluffy and soft for a few days - eat them within a day or two of being made.

For the frosting, I added a little sour cream, extra salt (I like the frosting to be a little salty) and also used 1% milk instead of cream - since it is what we had. I halved both recipes and easily made and frosted 12 cupcakes - perfect for a Superbowl party of three!

Chocolate Cupcakes
from Barefoot Contessa at Home

12 tablespoons (1 1/2 sticks) unsalted butter, at room temperature
2/3 cup granulated sugar
2/3 cup light brown sugar, packed
2 extra-large eggs, at room temperature
2 teaspoons pure vanilla extract
1 cup buttermilk, shaken, at room temperature
1/2 cup sour cream, at room temperature
2 tablespoons brewed coffee
1 3/4 cups all-purpose flour
1 cup good cocoa powder
1 1/2 teaspoons baking soda
1/2 teaspoon kosher salt

Preheat the oven to 350 degrees F. Line cupcake pans with paper liners.

In the bowl of an electric mixer fitted with a paddle attachment, cream the butter and 2 sugars on high speed until light and fluffy, approximately 5 minutes. Lower the speed to medium, add the eggs 1 at a time, then add the vanilla and mix well. In a separate bowl, whisk together the buttermilk, sour cream, and coffee. In another bowl, sift together the flour, cocoa, baking soda, and salt. On low speed, add the buttermilk mixture and the flour mixture alternately in thirds to the mixer bowl, beginning with the buttermilk mixture and ending with the flour mixture. Mix only until blended. Fold the batter with a rubber spatula to be sure it's completely blended.

Divide the batter among the cupcake pans (1 rounded standard ice cream scoop per cup is the right amount). Bake in the middle of the oven for 20 to 25 minutes, until a toothpick comes out clean. Cool for 10 minutes, remove from the pans, and allow to cool completely before frosting.


Peanut Butter Frosting

Tate's Bakeshop

* 1 cup confectioners' sugar
* 1 cup creamy peanut butter
* 5 tablespoons unsalted butter, at room temperature
* 3/4 teaspoon pure vanilla extract
* 1/4 teaspoon kosher salt
* 1/3 cup heavy cream

Place the confectioners' sugar, peanut butter, butter, vanilla, and salt in the bowl of an electric mixer fitted with a paddle attachment. Mix on medium-low speed until creamy, scraping down the bowl with a rubber spatula as you work. Add the cream and beat on high speed until the mixture is light and smooth.

Friday, February 5, 2010

Too early for Valentine's Day?


I had some cream burning a hole in my fridge (is that even possible?) and decided that I should make a chocolate ganache with it - what better use? A ganache is just a simple mixture of cream and chocolate (which I pretty much always have around). Then the only question was, what to do with the ganache?

I had made this recipe for TKO's before (Thomas Keller Oreos, from his Bouchon Bakery in Napa, CA) and they are heavenly delicious. Really chocolate-y, easy to make and very adaptable. To make them more 'oreo-style' the filling called for is a white chocolate ganache. Normally, I am not a fan of white chocolate, but these are so darn good I break the rules. Even so, I though they might be better with chocolate ganache.

I was right.

Not for the faint of heart or less than die-hard chocolate fan, these are like a turbo-charged double fudge cookie - you know the kind Mother's makes (the brand, not your relative - unless she also packages things in pink and white and displays them prominently on your grocer's shelves).

I highly recommend this recipe in any form...to substitute the chocolate ganache, just swap out the white chocolate with equal amounts of dark or semi-sweet (you could probably use milk chocolate too - just not my favorite) and add a pinch or two of instant coffee or espresso.

Thomas Keller Oreos
adapted from Bouchon cookbook

1 1/2 cups plus 3 Tbsp all purpose flour
3/4 cup sugar
3/4 cup plus 1 Tbsp unsweetened cocoa powder
1/2 tsp baking soda
1 1/2 tsp salt
15 Tbsp unsalted butter, cut into 3/4" cubes, at room temperature

1/2 cup heavy cream
8 oz. white chocolate, chopped

1. For the Filling: In a small pan, bring the cream to a boil. Remove from heat and add the chocolate. Let stand for 1 minute, then whisk to melt the chocolate until smooth. Transfer to a small bowl, and let stand for 6 hours to thicken up.

2. For the Cookies: In a large mixing bowl, combine the flour, sugar, cocoa, baking soda, and salt, and mix on low speed. With the mixer running, add the butter, a piece at a time. The mixture will be dry and sandy at first, but over 2 minutes, will form pebble-sie pieces that start to cling together. Stop the mixer and transfer the dough to your board.

3. Preheat oven to 350F. Seperate dough into 2 pieces. Roll each piece of dough between 2 pieces of plastic wrap or parchment paper to 1/8" inch thick. Using a fluted cutter, cut into rounds. Scraps can be pieced together and rolled out again. Place 1/2" apart on baking sheets lined with Silpat liners or parchment paper.

4. Bake for 12-15 minutes, rotating halfway through baking. Remove and cool in the pan for 5 minutes, then transfer cookies to a cooling rack. Cool completely.

5. To Assemble: Lightly whip the white chocolate cream to aerate and fluff up. Transfer filling to a pastry bag fitted with a 1/4" plain tip. Pipe about 1 1/2 tsp in the center of half the cookies. Top with another cookie to sandwich. Gently press down until the cream comes to the edges.

6. Cookies can be stored in a container for up to 3 days. Loosely cover. (They also freeze really well...)

Thursday, February 4, 2010

More Cake! Okay, really PANcakes.


Seeings as it is National Cake Month, I thought we should have more posts about, well, CAKE. These particular cakes were made for my niece's first birthday party. Raspberry Lemon on the right, and an applesauce cake with sweetened whipped cream on the left. My niece really only wanted to eat the raspberries, and everyone else just wanted to see her make a mess.

But the point is still CAKE MONTH. And I am not making this up. Well, originally I was, but then I googled "National Cake Month" and found this site:

http://www.gone-ta-pott.com/national_cake_holidays.html

Which confirms that February is, IN FACT, the month of glorious celebration. Of course, it's also National Pancake Month. I haven't made any pancakes this month, but did manage to make some at the tail end of last month. I had some friends in town visiting for the Sundance Film Festival, and a recipe for Gingerbread pancakes that I had been itching to try. Now, since my husband only likes straight-from-the-Bisquik-Box recipe pancakes, I had to use this opportunity to try out something new.

The recipe came from someone's request to Gourmet magazine for the Gingerbread pancake recipe served at La Note cafe in Berkeley. Now, this happens to be one of my favorite breakfast spots in the whole world, so of course I would try it. At the restaurant they serve these pancakes with poached pears, but I wasn't going to go that over the top.

So I served mine with strawberry pomegranate compote. And bacon. And maple syrup of course. Which really just led to a five person debate over the various merits of real versus artificial maple syrup. So we taste tested. Because, of course with the husband only liking Bisquik pancakes, naturally we had his preference - Mrs. Butterworth's syrup - close at hand. A man of discerning tastes, obviously.

Back to the pancakes - they were delicious. I am sure that in a debate there would be those to argue its claim to actually be 'gingerbread' seeings as it contained modest amounts of powdered ginger and no molasses. But they were sweet and spicy and just a little airy. The recipe made a ton, so I halved it and it still comfortably fed five of us. I should say that I halved it except for the coffee and water amounts, as well as the spices. What can I say, I am a sucker for cinnamon...

Gingerbread Pancakes (original recipe)
straight from the pages of Gourmet


(remember, I halved most of the ingredients...also, i found the batter to be pretty stiff, so I had to spread it when I poured it into the frying pan)

* 3 cups all-purpose flour
* 1 cup packed dark brown sugar
* 1 tablespoon baking powder
* 1 1/2 teaspoons baking soda
* 1 teaspoon salt
* 1 teaspoon ground cinnamon
* 1 teaspoon ground ginger
* 1/4 teaspoon ground nutmeg
* 1/8 teaspoon ground cloves
* 1/2 cup water
* 1/2 cup brewed coffee, cold or at room temperature
* 4 large eggs
* 1 stick (1/2 cup) unsalted butter, melted and cooled
* 1/4 cup fresh lemon juice
* Vegetable oil for brushing griddle

Whisk together flour, brown sugar, baking powder, baking soda, salt, and spices in a bowl. Whisk together water, coffee, eggs, butter, and lemon juice in a large bowl. Add flour mixture and whisk until just combined. Let stand 15 minutes (batter will thicken).

Brush a griddle or 12-inch nonstick skillet with oil and heat over moderate heat until hot but not smoking.

Working in batches of 3 or 4, pour 1/4 cup batter per pancake onto hot griddle and cook until bubbles appear on surface and undersides are lightly browned, 1 to 2 minutes. Flip pancakes with a spatula and cook until cooked through and edges are lightly browned, 1 to 2 minutes more. Transfer to a platter and loosely cover with foil to keep warm. Brush griddle with oil between batches.